 Quick Navigation
 All projects
  Hardware
 Links
Links Top projects
Alan numitron clock
Clapclap 2313/1386
SNES Pi Webserver
USB Volume/USB toys
Smokey amp
Laser cutter
WordClock
ardReveil v3
SNES Arcade cabinet
Game boy projects
cameleon
Home Presence Detector
 GitHub
AlanFromJapan
 Contact me
 Who's Alan?
Akizukidenshi
Elec-lab
Rand Nerd Tut
EEVblog
SpritesMods
AvrFreaks
Gameboy Dev
FLOZz' blog
Switch-science
Sparkfun
Suzusho
Datasheet Lib
Reddit Elec
Ermicro
Carnet du maker (fr)
alan numitron clock user manual
Last update: Tue Feb 17 20:52:01 2026
 This is the documentation for the Alan Numitron Clock.
Documentation
Power cable
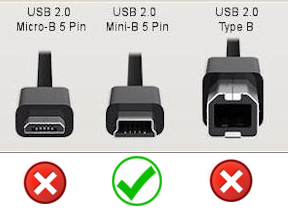 | You want an USB mini cable, like the old generation of consoles, etc... not the USB micro that you use for your cellphone. Usually you can find it in your closet or at the dollar store. |
Power supply
Requirements: the clock uses regulated 5v at about 250mA continuously, so you need to plug it to a power supply that delivers exactly 5V and at minimum 250 mA. That should be ok with any recent cell phone charger, but do check the label please!Examples:
If you use a cell phone charger, there will be no problem. If you make your own charger from parts, make sure to create a regulated 5v output. There is no regulation on the board itself (it's there but not populated) because it is assumed you will use a regulated power supply. If you don't know what I'm talking about, just use an old USB charger please.
Setting the time
|
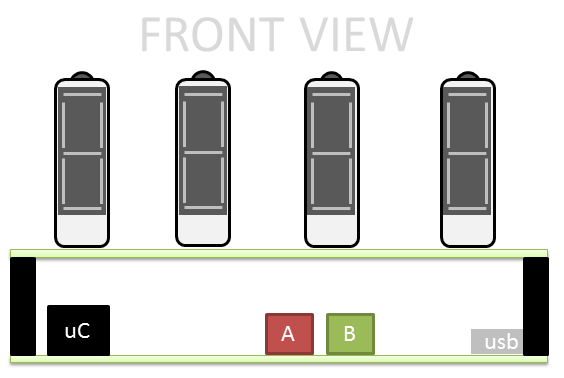
There are 2 buttons at the back of the clock: A and B. A = Select and B = Increase.
Note: the A/B button clock detection is not perfect so be patient and try again. Sometime it double clicks, sometimes it takes time to get it. Apologies for that, it is a known limitation of the code as of today (2017-04-10). |
Changing the battery
The clock needs a Li-ion CR2032 battery to function. Without a battery, it will quickly loose time or even stop working.Estimated life is 2 years or more, but it depends on the battery itself.
- Unplug from power
- (optional) Unscrew the 4 legs of the top board
- Remove old battery
- Put new battery (CR2032 of the dollar shop)
- (optional) Screw back the 4 legs of the top board
- Plug power
- Set time again (see above)
- Finished.
Any other problem
← contact me to the email on the left!説明書
パワーケーブル
|
| 我の時計がUSB miniが必要になります、現在のスマホのUSB microではありません、ご注意ください。普通に隣の100円ショップで販売していますがどんどん珍しくなりますのでもうちょっと大きな100円ショップに行かないと行けなくなる恐れがあります。 |
充電器
仕様: 我の時計が5v約250mAが必要になりますので、USBのちょうど5Vと250mA以上を出力出来る充電器しか利用しないでください。必ずチャージャーの仕様札を確認してください。例:
携帯の充電器を使ったら問題がありませんとおもいます。もし自分で作りたいなら、必ず安定化電源を利用してください。ボードに安定化回路の部分がありません(用意していますが基本的に空いているままにしています)。もし今の話を分からないなら、スマホの充電器を使ったほうが良いと思います。
時間の設定
|
|
時計の後ろにバトン二個あります:AとB。A=選択、B=プラス。
注意:A/Bボタンを押すときミス恐れがあります、申し訳ございません。たまにダブルクリック、たまにミスを行います。理由は現在に時計がボタンの状態を一秒に一回しかチェックしません。計画のTODOリストに入れています。ご理解をお願い致します(2017-04-10). |
電池交換
時計は通常通りに動くためにLiIon CR2032ボタン電池が必要になります。電池がなければか電池が切れたら、時間を守らなくなりますし、停止になる恐れもあります。予想に電池が2年間以上使えますが電池自身と電池の銘柄によります。
- USBケーブルを外す
- (任意) 時計の柱の上のねじを外す
- 古い電池を引き取る
- 新しい電池を入れ込む(100円ショップのCR2032電池でも良いです)
- (任意) 時計の柱の上のねじを入れ戻す
- USBケーブルを接続する
- 時間設定を行う(上記をご覧下さい↑)
- 終わり
その他の問題?
← 左にあるメールを使って連絡してください。英語でも日本語でもフランス語でもオケーです!
electrogeek.tokyo ~ Formerly known as Kalshagar.wikispaces.com and electrogeek.cc (AlanFromJapan [2009 - 2026])